Jimmy Mays, co-founder and managing partner of Café 7, still uses a cast iron skillet given to him by his great grandmother. The centrality of the pan in Mays’s kitchen is not just about nostalgia, though; he recommends a 12-inch cast iron skillet as one of the most useful tools in a home kitchen.
“It’s incredibly versatile, in addition to its durability,” Mays says. “You can use it on the stove top, in the oven, on the grill and even on a campfire.”
In fact, the only two downsides to cast iron Mays names are its weight — which makes it impractical for boiling pasta — and that if any part of it is hot, the whole thing is hot. Plastic sheaths on skillets have conditioned us to grab handles without a thought; that kind of conditioning can be quickly undone when using cast iron.
While I was talking to Mays, he was smoking salmon in his oven with a cast iron skillet. He really does use it for nearly everything, and the more frequently a cook uses cast iron, the fewer pots and pans are required … which is an important benefit for home cooks with limited storage or a minimalist aesthetic.
The price point is excellent, too. Mays recommends Lodge for cast iron novices. It is a popular brand, so they are widely available, and the average price is about $25. Given that one skillet does the work of a half dozen other pans, that’s a remarkable savings.
The Lodge skillet comes pre-seasoned, as well, and seasoning is the magic of cast iron. You might have heard that you’re never supposed to use soap and water on cast iron, which is only kind of true: It’s not ideal, but Mays said it doesn’t really hurt the metal as long as you season it afterward. Just coat all sides with a flavorless oil — like canola — and place in a 350-degree oven for about an hour: seasoned.
The oil penetrates the porous metal and protects it from oxidation and water damage. (It’s technically possible to warp cast iron, but most home cooks are not working with temperatures hot enough to damage it.) Mays also pointed out that all Lodge products come with care instructions on the wrapper, and they have an excellent website with tons of information and recipes.
One of the other primary benefits to cast iron is even heat conductivity. If you have had the experience of a “hot spot” on a skillet — and the scorching or sticking that results — you will understand how convenient it is to have every part of the pan’s surface the same temperature.
“Once the cast iron is heated to temp, the whole cooking surface is the same temperature and it maintains heat for a long time,” Mays says. “And once a cast iron skillet is seasoned, it’s a stick-free surface, which means no chemical films to make a pan non-stick.”
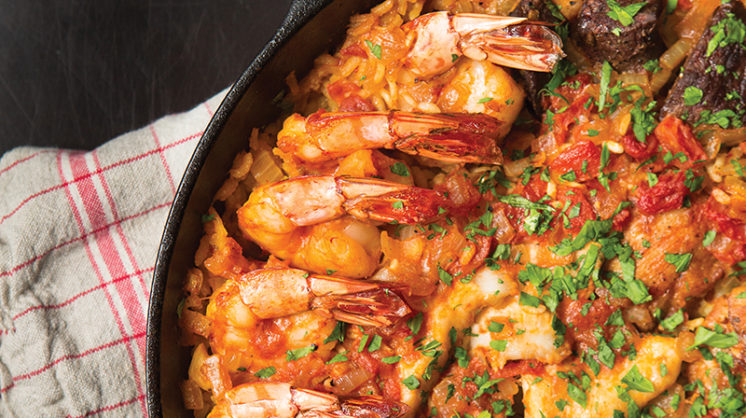
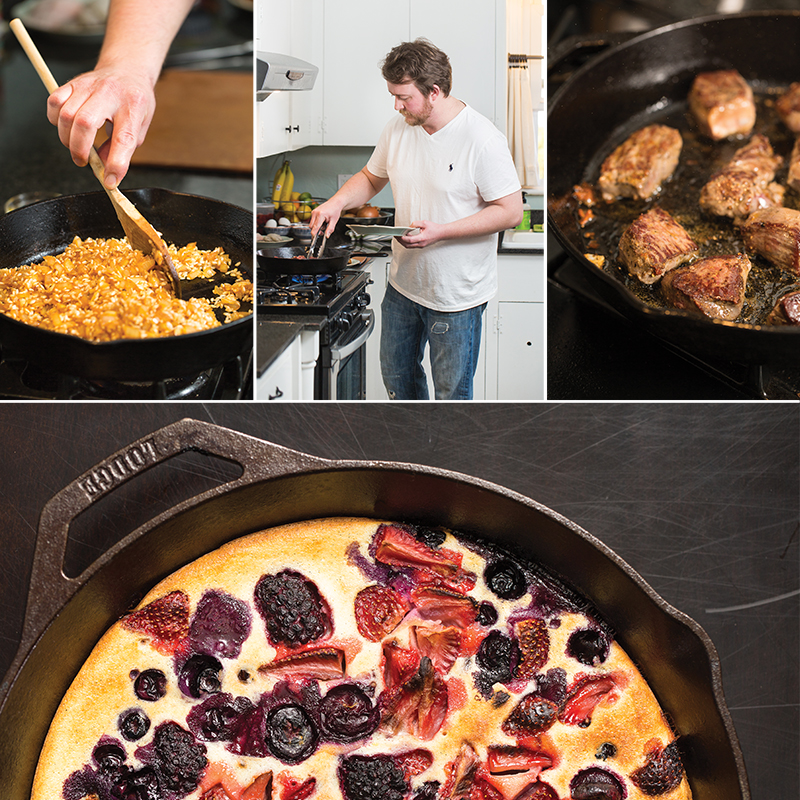
Main courses like paella will feed four to six people if prepared in a 12-inch skillet, as will desserts and cornbread baked in the oven. The ease of moving the skillet from stovetop to oven to finish off steaks and chops is another main selling point for Mays. To get us started, he has provided three recipes to illustrate the skillet’s versatility: “country” paella, which he makes with catfish and chicken; spinach artichoke dip; and clafoutis, a wonderful baked French dessert that is the love child of pie, cobbler and dump cake. You can find them on our website at 405magazine.com/405-Home.
►How It's Done
Oklahoma Paella
6 boneless chicken thighs
1/4 cup olive oil
1/2 lb bison ribeye
1/2 lb venison steak
1 yellow onion, diced
6 garlic cloves, chopped
1 bunch flat leaf parsley, picked/rinsed/chopped
generous pinch of saffron
1/4 cup white wine
1 (15 oz can) petite diced tomatoes
2 cups arborio rice
3 cups chicken broth (or water)
8-10 shrimp (16-20, peeled and deveined)
1/2 lb deep-skinned catfish, cut into strips
Spice Mix for Chicken:
1/2 tbsp paprika
1/4 tsp oregano
1 tsp kosher salt
1/4 tsp fresh cracked pepper
Season the chicken thighs with the spice mix, then let them sit in the refrigerator for at least an hour.
Preheat the oven to 350F, open a bottle of your favorite wine – for me, it’s Palmina Dolcetto – turn on the Pink Martini Pandora station and let’s have some fun.
Dice your onion and chop your garlic. Prepare the parsley, as well. Go ahead and steep the saffron in the white wine – or if you’re feeling frisky, some nice vermouth. Dolin Blanc would be ideal. Go ahead and open the can of tomatoes as well; your mise en place is almost complete.
Next step: cut your bison and venison into cubes; 2×2” works very nicely. Season the bison and venison with salt and pepper. Heat oil in cast iron pan over medium-high heat. (NOTE: This is the point when I remember to take my smoke detector down in order to avoid an ear-piercing squeal.) Use a wood skewer to test the oil – when you dip the skewer in the oil and it bubbles, the oil is ready. Sear the bison and venison on both sides briefly; just when it starts to brown will be perfect. Put them aside on a plate now … they will return. And remember that the proteins will continue to cook in the rice, so we don’t want to cook them too far now, as it will cause them to dry out later.
Once those are done, it’s time for chicken. You don’t need much oil in the pan at this point, as the chicken is covered in its own fat – unless you’re using skinless thighs, in which case you will need a small shot of olive oil. Sear the thighs on both sides until a nice crust forms. Put them on the meat plate and reserve for later.
The next part is the magic moment. Time to put it all together.
Make sure that the bottom of the cast iron skillet has a thin layer of oil. Allow it to heat back up after searing the chicken. Toss in the garlic and cook, stirring frequently, until it begins to brown. Add in the onion and stir until it begins to turn translucent. Stir in tomatoes and let them cook briefly, to allow the juices to caramelize a bit. Mix in the rice, and cook until the grains turn white. Deglaze with the saffron steeped in white wine. Add chicken broth and stir until the rice, tomatoes, onion and garlic are well blended.
This is the part where everything goes back in. Arrange all the proteins in the rice – try not to overlap them too much. Once the liquid comes back to a boil, put the paella into the oven. 20-25 minutes later, it is ready; you’ll know it’s done if there is no liquid on top.
This is a non-traditional approach to paella, but it’s a solid preparation for it. Traditionally, paella is cooked over an open flame, with the intention of creating a toasted rice bottom called socarrat. This alternative method is very easy, and is open to adaptation. You can substitute any of the proteins: mussels, clams, sausage, chorizo … whatever you have can go into this dish.